Monday, December 27, 2021

3D printing


 For this week, we were tasked to make an object that cannot be created subtractively. I hence experimented with different abstract functions and objects and came up with a floating design of 2 intercepting triangles.

Firstly, I created the sketch.

I then proceeded to extrude the sketch with different taper angles, which resulted with the narrow edges being shorter in height compared to the flat triangles.
I then proceeded to create a plane on the flat triangle and mirrored the design

I then saved this design as an STL file and exported it into Cura for slicing. The estimated time was 1 hour and 17 minutes, hence I reduced the dimensions slightly and changed the infill and profile, and lowered it down to 40 minutes. The infill I used is 10% as the shape I've used doesn't need to be strong to compressional forces. I chose 0.2 as the profile as I was ok with sacrificing a bit of quality and detail to the design.

STL file link: https://drive.google.com/file/d/12-CxmFeWyfIGK9qoG0Af-bXk_d7LWlwa/view?usp=sharing

The 3D printer we were using is the creality ender 3

Final product: 
Heroshot: 

After the experience, I became more confident in my abilities to design, slice, and use the 3d printer. and as my product did not turn out the ways I expected it to as the overhangs dipped back down and came into contact at some areas also made me realize that I needed more time to learn and research about the overhang limits of the printers we were using. It also made me realize how time-consuming 3D printing actually is as for such a small design, it still took 40 minutes. But I am confident that we will be definitely integrating the 3d printing technology into our future projects both in the next term and in year 3.

Sunday, November 28, 2021

Arduino Tasks

Arduino programming

This week, 4 tasks are assigned to us to interface input and output devices.

1. Input devices:

a. Interface a Potentiometer Analog Input to maker UNO

board and measure its signal in serial monitor Arduino IDE

b. Interface an LDR to maker UNO board and measure its

signal in serial monitor Arduino IDE

2. Output devices:

a. Interface 3 LEDs (Red, Yellow, Green) to maker UNO

board and program it to perform something (fade or flash

etc)

b. Interface the DC motor to maker UNO board and

program it to on and off using a push button on the board


Potentiometer Analog Input


After I replicated the physical board, I got to see the change in the effect of the Potentiometer Analog Input in person. The further I turned the meter to the right, the slower the blinking of the LED.

By looking through the Arduino. cc guides, I reminded myself that I can find the serial monitor to find the output of the potentiometer by adding [Serial.begin(9600);] under void setup and [Serial.println(sensorValue);] under void loop.l

Figure showing the change in output when turning the Potentiometer from left to right.


LDR input

LDR being light-dependent controls the led by changing its intensity when the light intensity around it changes


LDR is bright in high light intensity

LDR is dim in low light intensity


LED serial output

This activity was basically combining what I have learned from connecting a simple LED and the competency test in sequence. I connected 3 LEDs and made them light up in sequence with a 1-second interval.


Physical Arduino board wiring:


DC motor Output:
This activity was brand new, hence it was actually interesting to learn. There are many guides on the internet, all with varying solutions. The one I used is actually a combination of several sources, which I was very surprised to see that it works on the first try.

Physical Arduino board wiring:
Video of dc motor working:


Reflection:
These Arduino activities let me use what I have learned from the classroom and what I have researched to actual use, hence it felt actually very rewarding to carry out and see it work. It was also a reminder as both the Arduino and breadboard were not new to me as I have done it in secondary school, courtesy of SP for the experience. These skills that I have acquired through this experience made me a lot more confident for other projects such as the capstone in the future.


Tuesday, November 9, 2021

Laser cutting


Our improved SOP


Activity: Operation of the laser cutter


Start-up of the laser cutter

  1. Turn on the Air compressor (Skip for fusion Pro)

  2. Turn on the fume extractor.

  3. Turn on the laser cutting machine

  4. Turn on the PC


Operation of Corel draw

  1. Open CorelDraw on the computer

  2. Import desired  BMP, PNG, JPEG, DXF file, or SVG file into CorelDraw 

  3. Click on the cursor tool on the left panel and select desired line/shape

  4. Change the colors of line/shape to the desired operation 

(Red=vector / Green=engraving)

  1. Send the imported file to print (Ctrl-P) then press print.


Operation of epilog dashboard

  1. On the Epilog Dashboard, choose Autofocus: Thickness (Pro) / On (M2) on the top of the right panel

  2. Turn on Air Assist on the bottom of the right panel

  3. Load Material Library to choose what material is being cut/ engraved

  4. Add final adjustments to the material's position and the speed/power/frequency desired. Check with the personnel in charge if unsure 

(For both machines, position the object to cut at the top left corner so that the laser need not move too far to start cutting)

  1. Press the print button


Operation of 3D printer

  1. Check the file’s name and estimated time to cut on the LED Touch screen(Pro) / LCD screen(M2). Once confirmed, press the PLAY/GO button to start cutting.


Shut down of laser cutter

  1. Clear all material from inside the laser cutter

  2. Turn off the laser cutter

  3. Turn off the fume extractor

  4. Turn off the air compressor

  5. Shut down PC


Our last SOP was missing critical information, such as the operation of Corel draw, the fact that the Pro machine did not have an air compressor, and just being too messy to follow to be useful.
Hence in our improved SOP, we decided to split it into categories of steps (Startup of the laser cutter, Operation of Corel draw, etc) We also used the new knowledge we gathered to come out with a more comprehensive procedure to follow in Corel draw and in the epilog dashboard, by including the positions of the buttons on the software and what tools to use, etc.
In the end, we came out with a few designs for our parametric construction kit, such as hexagons and triangles. But in the end, we only chose the circle, rectangle, and squares as we realized that the material needed to print all the shapes will be unreasonable and that those 3 shapes are plenty for us to come out with multiple creative designs.

All in all, I passed my competency test in operating the laser cutter and I'm also more confident in using it to cut out my prototypes in the future. I have tested my knowledge on operation, Kerf, and the use of parametric infusion 360 in the sessions. By using parametric, we found it much easier to compensate for kerf on the spot. It was best represented when we used the wood of 4.5mm in thickness rather than the 5mm plywood we centered our calculations in, but the use of parametric meant that changing the slot thickness is much easier. It was also very exciting and fun to finally be able to operate the laser cutter, which will also help us in the future of our CPDD journey as it will help in making prototypes in the future. Initially, I thought that the operation of a laser cutter was simple, and just click and go. It was indeed simple, however, there were still more procedures than I thought there would be in the practical. After the experience, I have both a deeper understanding and appreciation of laser cutters and software related to their relative beginner friendliness and also their potential for experienced users.


Home

 Hello there.

I am Roy, a Team member of group 3.

My teammates are Nigel, Bjorn, and Vernon.

In this semester, I hope to be able to use the laser cutters and 3D printers confidently so that I can have somewhere to use my creativity and see it materialize. 

The ground rules for all members in group 3 are:

  • Be Responsible
  • Do your part
  • Be punctual
One should always do their part as a team member to give ideas, listen to opinions and do the work allocated to them to ensure that the group will progress smoothly and efficiently. Punctuality is also necessary to ensure that there will be minimal delays and setbacks when doing work.

Meetings with the group will be done online via means such as discord or Whatsapp every Wednesday and Thursday at 6pm for discussions and completion of tasks as a team. Such days are chosen due to the availability of the team members' times and schedules.

Sunday, October 31, 2021

CAD hp stand

 For this week, our task is to design a handphone holder using fusion 360 with the help of parametric.

Why use parametric? It will allow us to easily modify and tweak designs on the spot by adjusting set parameters that were pre-setted by us. 

 For simple designs like the one below, the use of parametric may seem futile as all the dimensions can be easily identified, but for complex 3d models where some parameters are inside the model and cannot be easily identified by the sketch., the use of parametric will come in very handy.


Firstly, I set the parameters that I would like to be used in the model.
L= Length
W= Width
H= Height of gap 


I then proceeded to make a sketch of my design, separating my handphone stand into two components that will be pieced together after being laser cut.

It is done assuming that the material that is being cut to be 5mm in thickness. Hence the height of the slot is scaled to 4.75mm to compensate the kerf by the laser cutter, so if the thickness is different, only H1 needs to be changed.


I then proceeded to extrude everything to 5mm to simulate the thickness of the material.


The file underneath is the embedded file of my handphone stand.


So I have learned in this session how to use parametric to design models and why is it useful in actual applications in the future for prototyping. In this task, I tried out many different versions of the stand but ended up with one of the simplest ones that one can come out with as I felt that it will represent the use of parametric the best, and at the same time look very interesting. I also found it easier with the use of parametric to compensate for kerf, as instead of having to think and calculate sometimes for the thickness or the height, I can set a predetermined value and simply insert (Height-0.5) in the dimensions. I use to think that the use of the parametric is useless and an extra step, but after realizing its potential especially in complex 3D designs regarding multiple components, i will use it more in every other project in fusion 360 to come.

Monday, October 18, 2021

CAD

Keyring


As a refresher, we were tasked to make a keyring on Autodesk fusion 360, which was nothing new as we did it last semester. 


Firstly, I created a rectangle that is 65mmx25mm in size 

Followed by an offset on the rectangle of 2mm

Added in fillets to round out the edges

Added a circle for the hole and my name

Proceeded to add different offsets and created the keyring

The refresher brought me back to how to use the basics of fusion360 again. This also made me realize how easy the software is to use for beginners and the potential of the software to do more complex structures for prototyping. 


Project Development Entry

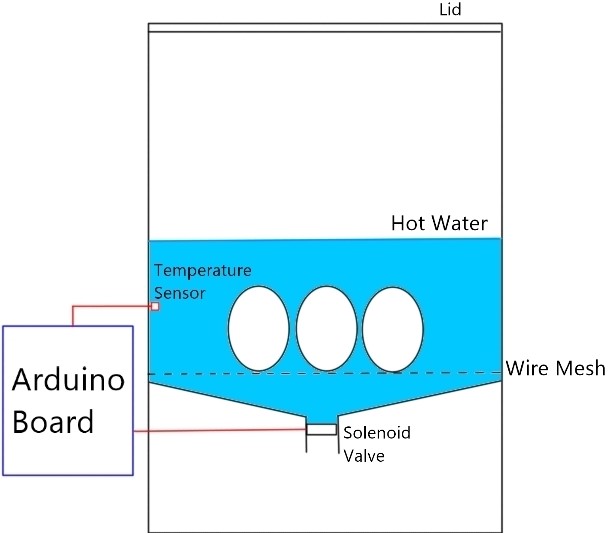
Our team Chemical Device We came out with an idea to help automate the cooking of soft-boiled eggs. It will help solve the eggs being over...